Using Docker & Docker Compose is a useful time-saver for development and running apps in production.
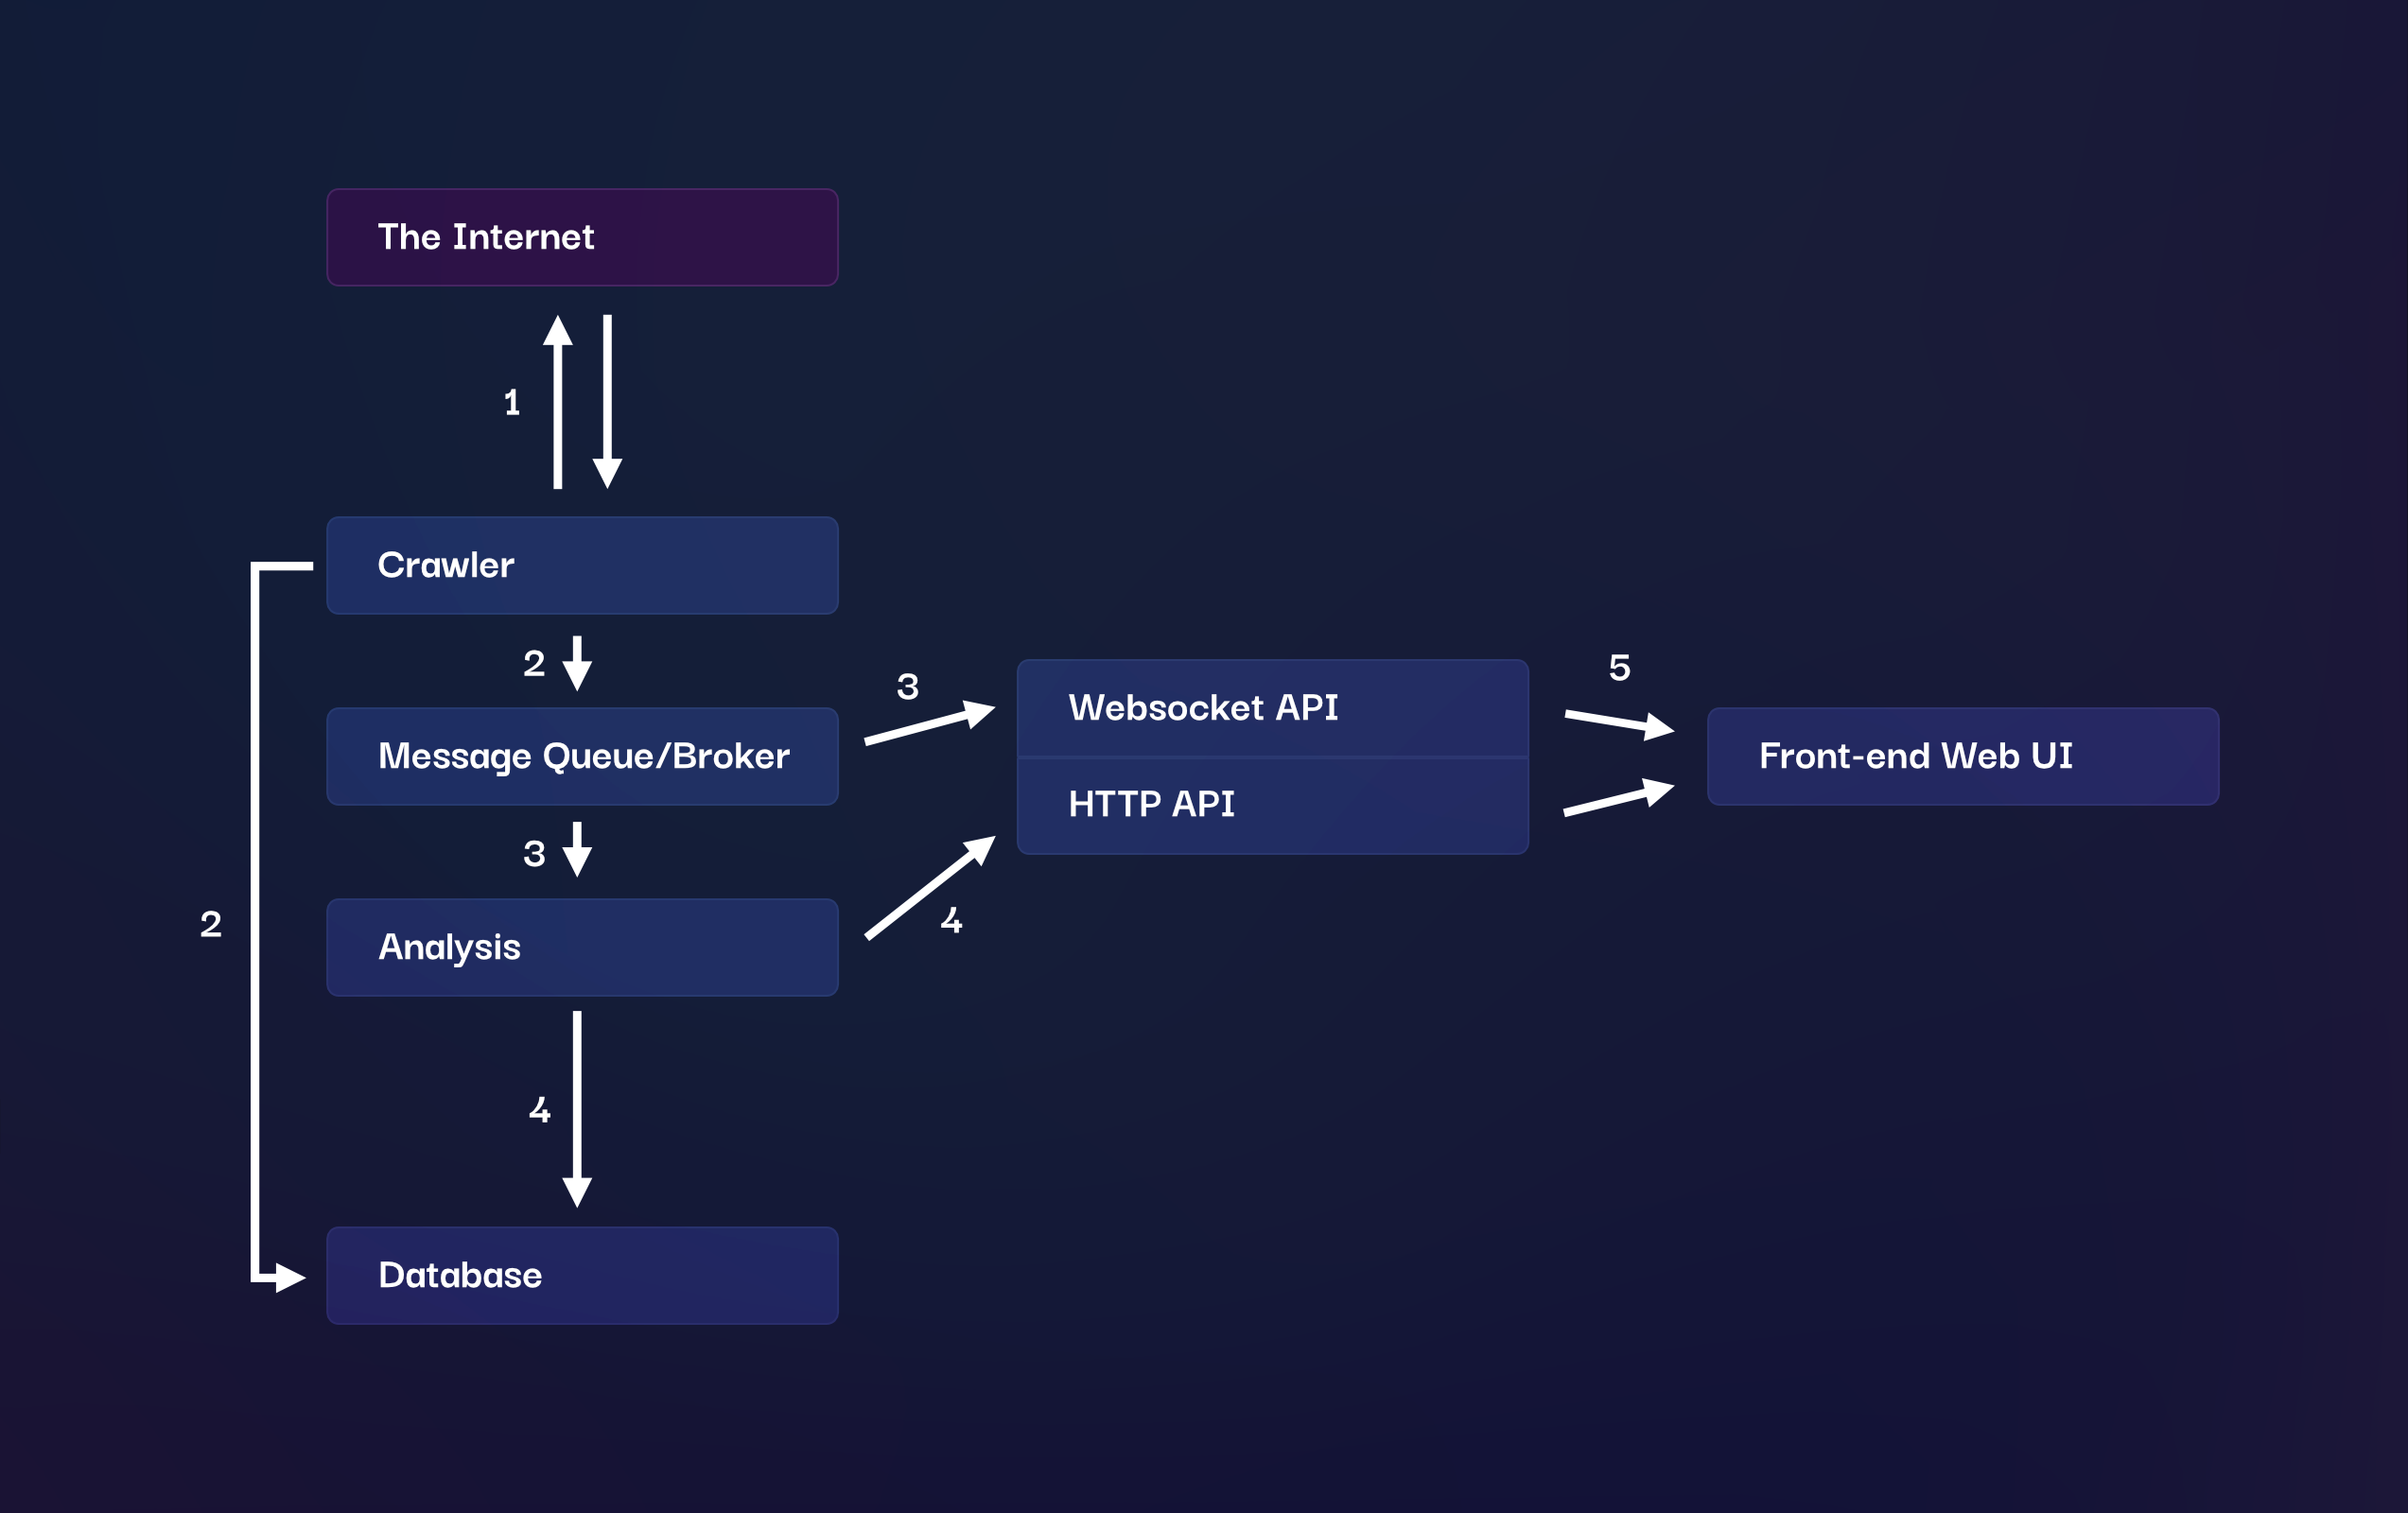
I've been hesitant to learn more about Docker in the past - I've always imagined that it was more difficult than it actually turned out to be. Recently, I've been working on Terabase: an application that aims to work out what's going on in the world. It does this by crawling a variety of different websites, analysing the content of websites to determine what subjects are being talked about and then grouping and further analysing subjects that are similar. The output of this analysis is displayed on a web front-end.
This calls for a fairly complex application with a number of different interconnected components. A perfect candidate for dockerisation. For this article, we'll be focusing on Dockerising the Crawler, Analysis, and Messaging Queue/Broker outlined below.
If you've not seen it before, Docker is an application that allows you to run your own applications inside containers that are isolated from the underlying host operating system. This allows you to create more portable applications that each have their own dependencies and can be run anywhere that Docker is installed. Docker Compose is an additional tool that allows you to manage multiple containers at the same time.
After installing Docker Compose, all you need to do is create your Dockerfile and docker-compose.yml files. For Terabase, I have a parent terabase folder which contains the docker-compose.yml file and subfolders (which are git submodules) containing each of the components of the application. Each of those folders contains a Dockerfile.
├── docker-compose.yml
├── terabase-analysis
│	├── Dockerfile
│	└── (the rest of the application files)
└── terabase-crawler
	├── Dockerfile
	└── (the rest of the application files)
The Dockerfiles are each responsible for building a single component of the application – for example the analysis or web front-end components – and the Docker Compose file then points to each of these Dockerfiles and adds some additional configuration.
Before showing the docker files, a few notes on terminology:
- An image contains the files for your application, dependencies and usually an operating system. When you run
docker buildyou create a new image using theDockerfileas instructions. - A container is a running instance of your application which is started from an image.
- A volume is a mapping from inside your container's filesystem to the host's (your actual PC or server) filesystem. This allows you to persist data across restarts of containers and access data from outside the container.
Here's an example of a Dockerfile for Terabase Crawler, a NodeJS application.
# Base this image on Alpine Linux with NodeJS preinstalled.
FROM node:16.17.1-alpine3.16

# Copy the files in "." (which is the dir on your host machine containing terabase-crawler in this example) to the "/app" dir inside the container.
COPY . /app

# Change the current working directory to /app
WORKDIR /app

# Install NodeJS dependencies as usual
RUN npm install

# Start the application using a normal npm script
ENTRYPOINT ["npm", "run", "start:docker"]
These Dockerfiles will differ depending on the type of application you want to run. Terabase Analysis is a Python application and the Dockerfile looks like this:
# Base this image on Debian with Python preinstalled
FROM FROM python:3.11.1-slim-buster

COPY . /app

WORKDIR /app

# Since I'm using pipenv outside of the container during development, we need to generate a standard pip requirements.txt. We don't need pipenv inside the container otherwise.
RUN pip install pipenv && \
    pipenv requirements > requirements.txt && \
    pip uninstall --yes pipenv && \
    pip install -r requirements.txt

# Download the language model for NLP analysis
RUN python -m spacy download en_core_web_lg

# Start the application
ENTRYPOINT ["python", "app.py"]
Now we have two containers (or services), we can tie them together using Docker Compose. Here's what a docker-compose.yml file might look like:
# https://docs.docker.com/compose/compose-file/
version: "3.9"
services:
  crawler:
    build:
      context: ./terabase-crawler
      dockerfile: Dockerfile
    depends_on:
      - queue
    networks:
      - backend
  analysis:
    build:
      context: ./terabase-analysis
      dockerfile: Dockerfile
    depends_on:
      - queue
      - crawler
    networks:
      - backend
  queue:
    image: rabbitmq:3.11.2-management-alpine
    restart: always
    environment:
      - RABBITMQ_DEFAULT_USER=terabase
      - RABBITMQ_DEFAULT_PASS=sxH5KuujupX4Vp$bE4ij
    ports:
      - "5672:5672"
      - "15672:15672"
    networks:
      - backend

networks:
  backend: {}

volumes:
  database:
    driver: local
You may notice a third service in this file - the queue. To send the crawled pages from the Crawler to the Analysis component, we're going to use RabbitMQ - some software that allows you to queue and send messages between applications.
Fortunately for us, there's already a RabbitMQ docker image we can use. This is a precreated image by the RabbitMQ team, so we don't need to create a Dockerfile for it - just a bit of configuration which will live in the docker-compose.yml file.
There's also a lot of other bits you can configure:
contextdetermines which directory a build should be performed in - in this case, the directory containing each of the services.environmentallows you to pass environment variables to inside the container.portsmap a port from your host to the container. RabbitMQ exposes a management interface at port 15672. If we want to see that through our computers web browser athttp://localhost:15672then we need the mapping15672:15672
There are lots of options for the docker-compose.yml file.
Another feature of Docker Compose is the networking. Any running container that shares a network will be accessible by it's service name as a hostname (crawler, analysis and queue). So if you need to access your queue in the crawler or analysis application code, you can reach it over the network simply by using queue as the hostname. In the crawler, I connect to the queue like this:
const amqpConnection = await amqplib.connect(`amqp://terabase:sxH5KuujupX4Vp$bE4ij@queue`);Now, to build and run your application you can use Docker Compose to bring everything up together. The depends_on section of the config will ensure that containers are brought up in the correct order for dependencies to be satisfied. Another tool that's helpful for this is wait-for-it.sh if a container comes up but the application inside it isn't available immediately. I use this in the crawler to ensure that the queue is listening on the correct port before starting the crawler. All you need to do it build it in to your launch command, which for this is npm run start:docker - so in package.json under the start:docker script, I have this:
"scripts": {
	"start:docker": "./wait-for-it.sh queue:5672 -t 30 && node app.js"
}
And that's it! Hopefully this is helpful in setting up or learning a bit about Compose for your own applications. Once you have this set up, it's really nice to be able to bring up your entire application with a simple docker compose up, you can also bring up and down specific containers if you want and lots of other useful things.
Useful References
- General Docker Compose information: https://docs.docker.com/compose/
- CLI reference for Docker Compose commands: https://docs.docker.com/compose/reference/
- All documentation for docker: https://docs.docker.com/
- Docker Glossary: https://docs.docker.com/glossary/

 sam [at] this domain